Search This Blog

Saturday, February 26, 2011

Copy Cat

I went to Joann's today.  I had a goal in mind: find some fabric for a sewing machine cover I found a tutorial on... And I did.  I fell in LOVE with Craft Couture's sewing machine cover. And I basically ended up copying hers right down to the bone.  Black and White with Pink accents. I found the b/w floral pattern for 5.49 per yd and it was on sale for 3.47!! :D  I also found some yellowed lace I'm dying to make some flowers out of. Pictures of my new sewing machine cover below.


I apologize for all of my horrible phone pictures.  Front view... I made my own ribbon out of the accent fabric.  They definately don't look as cute as Craft Couture's ribbons, but they'll do.

I think I put the ribbons down too far, but it's all good. I'm anything, but a perfectionist.


And here is my first EVER flower.

I just made some ruffles, spiraled them, and sewed them down.  I added several squares of a very thin mesh material (do you see it??) and threw on a cameo button I got from Hobby Lobby a while back.
I haven't found a hair pin I like well enough yet, so it's just sitting in my drawer for the time being.


Byee...
Lauren.

Thursday, February 24, 2011

Cute Little Felt Dolls

Howdy. :)
I found a book for kids on sewing with felt.  I looked through it and the stuff was pretty darn cute. I bought it. :D 
One of the tutorials was how to make a doll made of felt.  Pictures below.
Materials are the obvious. Felt for the skin, clothes, and hair.  Buttons for the eyes.  Needle&thread. Scissors.  Pin needles. Polyster filling.

I just cut out my pattern on computer paper.  You need a rectangle for the arms and legs, the clothes, and a circle for the head.  Cut out 2 circles (head), 8 rectangles (arms/legs), and 2 pcs for the clothes.

After you've cut out all of your pieces, sew on the eyes, nose, and mouth.  Face the circles for the doll's head Right side together and sew around the whole head, leaving the neck open.

Next, you just gotta be creative with the hair. I used the pattern for the dolls head and cut out a circle for the back of the dolls hair.  Then cut out bangs. Sew to the dolls head.


Sew the arms and legs together leaving one short side open and stuff them with the polyfill.  pin the arms and legs where you want them on the doll.  Sew along the entire body leaving the neck open.
Stuff the dolls body and head with the polyfill.  Place the dolls head inside the neck opening. Sew. :)

I did this project for my college speech class. We had to do a demonstrative speech, so I went ahead and made two dolls. 1 boy and 1 girl.  The girl is me, and the boy is my boyfriend. haha.

Have Fun!
Lauren.


Cherished Treasures”=

Wednesday, February 23, 2011

Modified Kitchen Towels

Hey!
I found a really neat idea from More Misadventures on modifying boring old kitchen towels.  I found the towels at walmart for $1.50 a piece, and ran by Hobby Lobby and bought a BUNCH of fabric.  I haven't had time to do much sewing lately, so my scrap collection is minimal.  It's actually doing pretty well lately though!  I found a booth at an antique flea mall that sells scrap fabrics, zippers, and ribbons for pretty cheap.  Let's just say I bought a lot. :)
Anyways, my mom loves pears, so I took a couple ideas from More Misadventures.  Pictures below.

I sewed on some pleats, then sewed a strip of fabric to hide the ugly. (;

Pears.  Don't look at my sad attempt at sewing a straight line, please.

pears again. I particularly do not like this one.  nothing worked out like I planned it to.  That middle strip of fabric??? it was supposed to be the length of the other strip, but for some reason it isn't. 
My personal favorite.  I love the black/white theme on the green.


And this is a little sad random bookmark I made from the scraps. :P


Byee.
Lauren

Tuesday, February 8, 2011

So...

My boyfriend and I have been aching for a new project lately after we made a night stand for his room.  I decided since I am a student, and I don't have a desk in my room that we could make a desk!  I had no idea what I wanted, so I typed in sewing desk in google images.  ((I need a sewing desk too. I've always sewn at my kitchen table, but its not comfortable))  I came across a really pretty sewing desk on a blogger website.  I looked around the website and thought, "Wow, there are people out there just like me".  Cheesy I know, but I can't believe there are so many people out there who have the same interests as me.  :P 

Anyways, this blog is basically for me to put my little projects up to look at and admire.  I don't expect anyone to really look at it because to be quite honest, even though I've been sewing for about 7 years, I am NO good at it.  :)

I will however put some pictures up of the night stand that my boyfriend and I made. :D

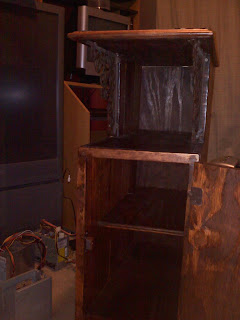
This is my boyfriend working on the night stand.  He needed something really narrow to fit between his bed and his couch. 

Side view.  We found some rustic looking metal decorative pieces (supposed to go on mail boxes) and we put them on both sides of the opening.  Found them at hobby lobby, original 7.99, but they were 50% off!

The inside.  We put two shelves, and the door has a magnet to help it stay closed all the time. LOTS of strorage space.

And a frontal view.  We are really proud of it, seeing as it is the first piece of furniture either of us has ever made. 

Don't think I'm taking most of the credit, my boyfriend did the majority of the work.  The saws, hammers, nails, all that good stuff?  Well, I'm just too clumsy for all that.  I helped with the mathematics, design, and staining. :)

byeee.
Lauren